Showing posts with label homekeeping. Show all posts

Tuesday, September 11, 2012

Afternoon snack: Cranberry Cereal Bars


Need a little afternoon snack to get you through til dinner?  These little bars are a favorite around our house. As easy as Rice Krispie treats, but a whole lot tastier in my opinion.  There's something about the crunch and flavor of the Cheerios in these bars that I just love.  So a quick, easy, kinda-not-terrible treat for you...plus your kids will love to help make them!


Cranberry Cereal Bars
4 Tbs butter
1 10 oz bag mini marshmallows
6 cups Cheerios (or other toasted O kinda cereal)
1/2 tsp salt (sounds weird, but critical- don't omit!)
1 cup dried cranberries

Spray a 9x13 dish lightly with cooking spray.  Melt butter in large saucepan over medium heat.  Stir in marshmallows.  Stir constantly until completely melted.  Remove from heat and add cereal, salt and cranberries.  Immediately transfer to prepared pan and pat into place firmly.  (I usually use a large spoon sprayed with cooking spray to keep from sticking.) Let cool about an hour.  Cut into 24 bars and enjoy!

recipe slightly adapted from Everyday Food
photo: courtesy of Martha Stewart 

Monday, October 24, 2011

Peanut Butter and Honey Popcorn

I first started making this popcorn recipe last year and my kids love it!  For some reason it is a fall-ish snack to me so I haven't made it in almost a year.  The kids were delighted when they saw it spread out on the table when they came in from playing outside.  It's really easy, different, but delicious!

Peanut Butter and Honey Popcorn

1/2 cup peanut butter
1/2 cup honey
1/2 sugar
1 tsp vanilla
2 bags microwave popcorn ( or 16 cups popped popcorn)
brown grocery bag

Make popcorn according to package directions.  Place popped kernels in bowl and then sift through popcorn to place it in grocery bag, careful to not get any seeds.  (Biting on one of those is a major bummer!) In medium saucepan, combine sugar and honey and bring to a rolling boil.  This will take a few minutes.  Remove from heat and add peanut butter and vanilla.  Stir to combine then pour mixture into bag on popcorn.  Shake vigorously to coat the popcorn.  Spread out on cookie sheets or waxed paper to cool.  Note- this popcorn doesn't harden like caramel corn.  It's stays soft and somewhat sticky, but not stuck-in-your-teeth sticky.
It makes a great treat for school parties or fall activities.  These are all packaged up and ready to go with Mati to his Harvest Party tomorrow at Tuesday School.  Free printable bag labels are from here.  I printed and cut them out and them folded in the edges of snack size ziploc bags and stapled on.  Easy and so cute!

Tuesday, September 13, 2011

Painted wallpaper

A few weeks ago Cale and I tackled a project I've had on my to-do list for several months.  I wanted to do something to brighten up the wall in our front room (which serves as playroom, school room and entry way).  Initially I thought about painting a chevron pattern on the wall, but then decided that was too trendy and I'd get tired of it quickly.  But I couldn't find just was I was looking for until I found this over at jones deisgn company.  We finally set to work and about 16 hours later, this was our finished product!

Cale did all the stenciling on of the pattern and I painted most of it myself.  It took us parts of 5 different evenings and while you might think 16 hours sounds like a lot, it wasn't bad and the finished result was so totally worth it!
I realize that my pictures don't do it justice, but here's another one anyways!  It adds so much personality to this space without being overbearing.  We are so happy with how it turned out.

Next up around here: the stairwell collage...

Saturday, May 28, 2011

My new summer salad

I didn't have an old go-to summer salad, but if I did, I'd be replacing it with this one!  I made this last night as a side with Salsa Verde Tacos (which were also awesome!) and it was so darn good.  I thought it would be great with Mexican food and it was, but it would also be a great bbq item because it isn't a strong flavor; it just tastes fresh and healthy!  My kids gobbled it up, too which isn't always the case with a salad.  
photo courtesy Food Network

Black Bean and Corn Salad 
1 can black beans, drained and rinsed
2 cups frozen corn, unthawed (I used Trader Joe's Roasted Corn and it was delish in it!)
1 small red bell pepper, diced
1/2 red onion, diced
2 tsp hot sauce
1 lime, juiced
2 Tbs canola oil
salt and pepper

Combine all ingredients in a bowl.  Let sit for at least 20-30 minutes (and it's even better the next day!) for flavors to mix.  Corn will thaw as it sits and keep salad nice and cold!

Adapted from Rachael Ray

Make it this weekend for that cookout you know you're going to!

Monday, March 28, 2011

Art that makes me happy

Several weeks ago, Amber showed me a print that she bought as part of her bedroom re-do.  I absolutely loved what it said and it got my creative wheels turning.  Cale and I have always loved to travel, especially together and we've been lucky enough to travel all over the US as well as a handful of international countries.  We started planning last year for our 10 year anniversary because we hope to go somewhere special.  We just love to see new places and add to that, my husband has a deep and abiding love of maps.  He has a freakishly good memory when it comes to navigation and can generally look once at a map and know exactly where to go, even if it was years ago.  So we love to travel and he loves maps...enter our new artwork...
Our bedroom has really high ceilings, and when we first re-did our bedroom almost six years ago, we needed a cheap solution to fill in some major wall space.  Thanks to Ikea we had cheap frames and okay prints of flowers that served their purpose but never meant much.  The frames we had filled the space well so we decided to just re-use them to create something new.
We purchased some old maps on etsy and used a mishmash of them for these pieces.  I decoupaged them to the old flower prints and we used the Silhouette to cut out the letters from card stock.  Now that big empty space on our wall is filled with art that means something to us, that represents us.  And isn't that what art should be?
Real life: messy dresser, but we got them hung up. And it really does make me happy!

Wednesday, February 9, 2011

Decals and cookies

I realized today that I never shared one of my favorite Christmas presents.  And that's a shame, really, because I love it!  Then I realized that I was going to be showing off my mixer and am empty mixer is pretty boring.  So I whipped up a family classic.  My mom made these all the time for us and they are a recipe I still turn to when we're in need of a cookie fix, but I don't feel like baking.

But first, admire my KitchenAid decal.  I found it here and ordered it for myself for Christmas (on Cale's behalf of course because I like to be helpful!). It arrived and I waited for it and then Cale forgot to wrap it and put it under the tree.  Oh well!  I've got it now and it makes me happy every time I use my mixer.  Since it's always out on the counter it adds a little personality to my otherwise boring (but oh so useful!) appliance!


And now back to the cookies. Enter: The Toffee Bar.  No idea why the toffee, since there is none included and in fact, you probably always have these items on hand.  I like to make up a half batch for us because it satisfies the cookie craving without too many leftover.  It's also a fun one for this time of year, because you can shape it into a heart for a little Valentine treat that takes about 5 minutes to make.

Toffee Bars
1 cup butter
1 cup sugar
1 tsp vanilla
2 cups flour
1 cup chocolate chips
1 cup walnuts (or pecans)

Cream butter and sugar together.  Add vanilla.  Then add flour and mix til totally combined.  Stir in chocolate chips and walnuts.  Press dough onto cookie sheet in a rectangle (or a heart!).  Bake at 350 for 16-20minutes or until edges are golden brown.  Slice into bars while still warm.  Wait til cool to remove from pan.


-I like to under bake them a little bit so they are nice and chewy. Also, if you're going to make a heart shape I would recommend doing it with a half batch otherwise it's a lot of dough to mess with.

Sunday, November 21, 2010

Christmas Projects: Tree Pillow

Back in September I stood in the checkout line at Target and my eyes landed on the Better Homes and Gardens Christmas Craft magazine.  I'm not one of those people who thinks you can ever start thinking about Christmas too early, so I snatched it up.  I loved several of the projects inside,  but was immediately taken by an appliquéd tree pillow.  I loved the simplicity of it and the idea of finally trying my hand at appliqué.  Much like my wreath, I was surprised at how pleased I was with my results.  See for yourself...


I think it turned out really cute although somewhat difficult to photograph!  It has found a happy home on the chair in our school/play room.  And I've discovered how easy and fun it is to appliqué!  Next up, a Christmas t-shirt for Haven.  If it turns out, you'll surely be seeing it here!  

Wednesday, November 17, 2010

Christmas Projects: The Wreath

I was so excited about the project I mentioned yesterday that I couldn't wait to get started on it once the kids were in bed.  Two hours and fifteen minutes later I was done and this is what I created:

Meet my yarn wreath, also known as a door sweater!  It's not often that a project I tackle actually ends up like I envision in my head, but this one did.  I could not be happier with how it turned out.  I love it!  I saw the idea on etsy (of course!) and thought, "Hey! I can do that!" And I was right.  The going rate for one on etsy was at least $30.  Mine is larger then most I found on there and it cost me $6.50 in supplies with yarn to spare.
I also learned how to make ruffles last night.  They aren't perfect, but they still look good on their new home.  For us, I love the reds and browns; it fits us and my style and will be perfect for the winter holidays and beyond.  But truly the possibilities are endless with the different yarns and fabrics or felts.  I'm in love with this project!  I'm not sold on the fabric hanger, but I was so excited to show it off that I just tied some scrap fabric on to hang it.  Maybe some ribbon or even just a piece of yarn...we'll see.

So that's my big project!  I actually finished up another little Christmas item yesterday, too (pictures of that to come).  Two projects in one week is unheard of for me.  But I was reminded that I do love having a creative outlet and I need to make more time for it.

Anyone's door looking lonely and need some company?   Make it a door sweater!

Thursday, September 30, 2010

Freezer cooking night

This was the scene of Melissa's kitchen on Tuesday night after nine of us gathered for Recipe Club. We tried something new this time and all brought ingredients to put together two different recipes that would leave us with 4 meals to stash in our freezers. I didn't take a picture of the chaos on the other side of the kitchen- I mean, nine women all cooking in one place- it was a little messy! But this was the fruit of our efforts, stacked 2 and 3 high, chicken enchiladas and stuffed shells. Our little experiment turned out to be a huge success, at least in my opinion! Can't wait to try it again!

Friday, May 21, 2010

Happy dishes and a favorite meal


My happy dishes have made their way back to our table again. Last night they were filled with one of our favorite ways to eat zucchini. We usually eat this as a main dish, but it's also great as a side with grilled chicken.

Veggie Veggie Couscous
for the veggie part:
2 Tbs olive oil
2 garlic cloves, minced
1 medium onion, diced
2 tsp. cumin
1/2 tsp. turmeric
1 tsp. paprika
1/8 tsp. cayenne
salt and pepper to taste
2 medium zucchini, cut into 1/2 inch cubes
15 oz can chickpeas, rinsed and drained (optional- I don't always add these and if I do, only half the can)
16 oz can diced tomatoes, undrained
1/2 cup raisins

Heat oil in large skillet over med-high heat. Add garlic and onion and cook for 2 minutes. Sprinkle spices over onion and stir constantly for about 2 minutes. Add zucchini, chickpeas (if using), tomatoes and raisins. Cover pan and lower heat to medium. Stir occasionally until zucchini is tender and juices have thickened, about 10 minutes. Serve with couscous.

For couscous: Boil 1 1/2 cups chicken broth, 1 Tbs butter and a tsp of salt. Stir in one cup of whole wheat couscous and remove pain from heat. Let stand 5-10 minutes and then fluff with fork before serving.

Another delicious variation is to add a diced red pepper in with the onions. Really, you can't fail with this one. We love this dish and can't wait til we have lots of generous neighbors unloading zucchini on us like crazy!

Thursday, April 29, 2010

Home

I signed an enormous stack of papers and took on huge amounts of debt five years ago. We closed on our house on that rainy Friday and came home and started peeling down wallpaper. We'd rented this house for a few months before we bought it and I was desperate to start working on it. You'll see why when you look at the pictures! Most of you have never seen what our house looked like before we remodelled the entire thing in about 9 months so I thought today was an appropriate day to show off our hard work. And make us feel better that we haven't done anything ambitious lately!

The "front room" complete with peach paneled walls. Bet you can't guess where it's at in the house?
It's now our play room, but is always called the front room. Catchy, isn't it?
The downstairs bathroom was gray and so was your mood after seeing it.
Completely updated including a vanity table built by my handy husband. Oh how I love my vessel sink.

Haven's room required the least amount of work. All we did was paint and replace the light fixture and take down that weird shelf thing.
This was from when she first moved into her big girl room, but it looks pretty much the same.
Oy. The kitchen hurt your eyes! Ugly tile, linoleum, two kinds of wallpaper...where to start!
How about with some red paint?
Snazzy built-in range anyone? With a mural of small children baking bread above it? For real.
I'll take this one instead please! Butcher block countertops, tin backsplash and some stainless steel appliances.
The true beauty of the house- built in "entertainment center" that was too narrow to hold a tv. I'm sure you are wondering how we could have parted with this. Yes, those are narrow strips of mirror placed at an angle. And please note the walls are painted pink in my living room. I spared you a shot of the pastel splatter paint wallpaper that graced the other wall.
The alcove was made for our very large couch- a perfect fit. I didn't even bother to pick up before I took this picture today. Sorry.
More pink in our master bathroom, complete with coordinating wallpaper border from our bedroom.
This isn't a great picture, but you get the idea. A massive transformation that included one of my favorite features- our cork flooring. And I still love that floor even though we had to replace part of it when the toilet leaked and it ain't cheap. But it's worth it! Good thing it's not that big of a bathroom!
Ain't she a beauty? And you can only see one of the two patterns that greeted you floor to ceiling in the master bedroom. It was such a shame because we have a great space with high ceilings and cool angles- not at all what you'd expect in our old house.
Much more relaxing- pale aqua walls and chocolate brown linen headboard and cornice boards. Once again built by my man. I'm the brains, he's the brawn.
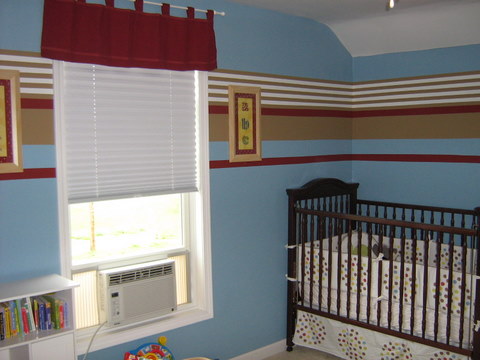
And this special little corner of our house- with it's bright blue panelling, drop ceiling and lovely carpet provided one of the greatest challenges.
It's now where my sweet boy rests his little head. I realize that the blues don't look that different in these picture but I can assure they are. This was actually Haven's room when we first re-did it and was very cute yellow and green and girly. Now it's all sorts of brown and blue and stripes and dots perfect for Mati.

So that's my house. I look at before pictures of this place and can't believe we bought it. What were we thinking? Back in the days when we were young and naive and hard working. I like to think of myself as a visionary, but this definitely pushed us to the limit, especially since we were under a time crunch called having a baby. I can still get tired looking at all we did around here, but I'm so glad we did. It's totally us. And I'm never leaving.

Tuesday, March 30, 2010

A simple skirt (or how I burnt off frustration and a bad mood in about an hour)

Sunday afternoon there was no mistaking I was straight up grumpy. Not sure why or where it came from. I just was. In an effort to spare my family more of my wrath I decided to focus my energy on something productive and creative. Here's the finished product:


I used this simple pattern and instructions and even I, the beginning sewer, was able to complete the skirt start to finish in about an hour. Not my favorite fabric choices, but it was what I had and Haven never shies away from anything bright, butterfly-y or purple so I figured it was going to be a hit with her. Eight strips of fabric sewn together with blanket binding as a waist band and it was done. I can see more of these skirts in my sewing future!

Thursday, February 25, 2010

Conquering Kitchen Fears: Volume I

Guess what this is a picture of? My very first (and definitely not my last) batch of homemade whole wheat pita bread. I have wanted to try making some for a very long time and was always intimidated by it. Well that ended today! Start to finish, including rising and baking, it only took me an hour to turn out a dozen delicious pieces of pita bread. And then they turned into this for dinner...
Pitas topped with fresh spinach, roasted red peppers, havarti with dill and some fresh pepper and sea salt...fantastic!

This recipe was so simple and easy; I can't recommend it enough! My notes are in italics.

Zohar's Pita Bread from Meet Me in the Kitchen
1 packet yeast (or 2 1/2 tsp)
1/4 cup warm water
1 tsp sugar
1 1/2 cups all-purpose flour
1 1/2 cups whole wheat flour
1 cup warm water
1/2 tsp salt

1. Mix first 3 ingredients, then add the next 3 ingredients.
2. Knead for 10 minutes, and let rise for 30 minutes. (I did this all in my Kitchenaid making it even easier!)
3. Take a ball of dough just smaller than your palm and roll it very thin (1/4 inch) with a little flour on the surface and a rolling pin as needed.
4. Place 2 rounds on an ungreased cookie sheet and broil about 5 inches from the top element until they puff up and start to turn light brown in spots. This goes very fast (less then a minute for me) so you have to watch closely and do not get distracted. Turn them over and brown on the other side. This will only take half as long as the first side.
5. Repeat with remaining dough.

What are you afraid to try making on your own? What will be next on my list?

Wednesday, January 13, 2010

Healthed-up Banana Chocolate Chip Muffins

I came across a recipe for these muffins last week, and as I'm prone to do, changed it quite a bit. Here's the original recipe if you're interested. Below is my "healthed- up" version. Haven ate three that afternoon and asked for more but I cut her off.

Banana Chocolate Chip Muffins (makes about 16)

1 cup whole wheat flour (I used white whole wheat. Have you tried this? It's amazing!)
3/4 cup white flour
1/2 cup sugar
1 tsp baking powder
1 tsp baking soda
1/2 tsp salt
1 egg
1/4 cup canola oil
1/4 cup unsweetened applesauce
1/2 cup plain fat-free yogurt
1 tsp vanilla extract
1 cup mashed ripe bananas (about 2)
1/2 cup mini chocolate chips

In a large bowl combine the dry ingredients. In another bowl combine egg, oil, applesauce, yogurt and vanilla. Stir into dry ingredients until just moistened. Stir in mashed bananas and chocolate chips. Fill greased muffin cups 2/3 full and bake at 350 degrees 20-25 minutes or until toothpick inserted in the middle comes out clean. Cool for 5 minutes in pan before removing. Finish cooling on wire rack. Enjoy!

Sunday, September 27, 2009

Trying something new

I have a strange interest in knowing what people ate for dinner. Call me voyeuristic if you must, but when I'm driving around in the evenings and see the light in the kitchen on, I'd love to know what's going on that table. Is it a family favorite? Chicken? Beef? Pasta? Who fixed it? From a recipe? I think it's just fascinating to know what people are fixing for dinner and why. Was it the easiest option? A celebration? Someone's favorite meal?

For the most part, I love to cook. I like meal planning and thinking through what we haven't had in awhile and coming up with a menu that we all like. I like to care for my family in this way and it comes very naturally to me. I also like to try new recipes. I aim to fix something new at least once a week. This is not hard because I'm inundated with magazines, blogs and shows that all offer me new ideas. You might think I'm crazy, but my biggest issue with planning meals is narrowing down my choices. Too many ideas, too few meals! This week's menu plan ended up getting turned all around and we ended up trying a new recipe every night. And because this is interesting to me, I thought I'd share for those of you who are also looking for some new dinner ideas.

Monday-Honey Lime Chicken Enchiladas I have an excellent enchilada recipe that has been our favorite for years, but this one ranks right up there. So delicious! For a slight variation on this recipe check out the one here. I made two pans and stuck one in the freezer for another night.

Tuesday-We had a happy fall meal and I made Bacon wrapped chicken breasts with maple gravy. The gravy recipe is here. On the side was one of our absolute favorite sides, veggie potato mash.

Wednesday- I have been trying to utilize my cookbooks more often so picked Pasta with zucchini, roasted garlic oregano and feta from Robin Miller's Just In Time. (The link is to a similar recipe from Food Network.) It was good, not great, but healthy and quick to throw together. We all liked it and the leftovers tasted better, but probably not something I'd make again.

Thursday- I had something entirely different planned, but it didn't sound good so I dug through my list of want-to-try and found Tortilla and Black Bean Pie. It was a hit with all of us! Another benefit to having a well stocked pantry is being able to change my mind about a meal and come up with something different. This recipe was a great use of pantry items and things that I almost always have around, like whole wheat tortillas and cheese. Delicious.

Saturday- Another simple meal to throw together was Honey Mustard Chicken biscuits. We all loved these even though they didn't turn out quite right. The batter was too wet so next time (and there will be a next time!) I would add more bisquick or less milk. The vegetables in the batter add quite a bit of moisture and made them super moist. I think they were intended as a snack but we ate them for dinner and they were quite filling. They were a fun way to serve chicken for dinner and stretch a buck!

Yesterday afternoon Cale and I decided we need some sort of dessert-y treat so we flipped through my copy of Martha Stewart's Cookies. We settled on Banana-Walnut Chocolate Chunk cookies because 1)they sounded amazing 2)I had all the ingredients 3)they were easy to throw together. Oh my word- they are good! We've eaten waay too many of them since yesterday afternoon. I found a link to the recipe online, but once again, used my own cookbook. See, I'm really trying to utilize them!

So that's what we've been eating around here. Have you tried anything new lately and enjoyed it? What did you have for dinner?

Wednesday, September 16, 2009

Lunchtime rut?


Today has not been the best day really. Two sick kids and a travelling dad have made it a long day, but it's had its bright spots. I have lots of cuddle time with both my kids and have even read quite a bit. I figure if I'm going to just sit on the couch holding someone I might as well do something productive like read. It's been great! Another bright spot was my lunch.

This morning, before I knew the extent of the sickness about to hit our house, we ventured to the library. I had the book Lunch Boxes and Snacks waiting for me on hold and was so excited to flip through it when we got home. I don't know about you, but lunch can get really boring, really fast around here. I've read about this book on several different blogs and had heard nothing but good things about it. I was looking forward to some inspiration to move us away from our standard lunches. By the time lunch rolled around things were not looking good here and I had a Pb&J in my future. But this book saved me! As I scanned through the book during a cuddle session with Haven I came across the following recipe and knew it was meant to be my lunch. I had everything on hand and it looked to be just a step or two more complicated then the previously mentioned peanut butter sandwich. It was delicious and something that will be repeated around here often! Just not often enough to get us in a rut!


Turkey, Muenster, and Cranberry Sandwich

In a small bowl combine 1 Tbs mayo with 2 tsp chopped dried cranberries and some finally diced green onion. Season with salt and pepper. Spread mixture onto one slice of whole grain bread. Layer on 3 slices of deli turkey, a slice of Muenster cheese and some lettuce. Top with another slice of bread. Enjoy!


-adapted from Lunch Boxes and Snacks by Annabel Karmel


I already ordered my own copy of this book off of half.com for less the $2! If you need some lunchtime inspiration then look no further then this book!

Friday, September 4, 2009

Late summer treat


Vanilla yogurt + blueberries + raspberries + a few hours in the freezer = one happy, but very messy girl

Tuesday, August 11, 2009

Summer's bounty

We have been blessed with wonderful neighbors; wonderful neighbors with a big garden. During summer months when produce is a-plenty I keep a large pottery bowl on my counter. Thanks to our neighbors it hasn't been empty in weeks! Here are a few recipes we've been enjoying with our abundant yellow squash, zucchini and tomatoes.

Yellow Squash and Corn Casserole I'm making this for the fourth time in three weeks. We all really love it!

Oven Roasted Tomatoes Tomatoes taking over every inch of counter space? Then please, please make these! I have made a few batches and we just devour them! We enjoyed them on paninis with fresh mozzarella and basil. Also the perfect way to jazz up a turkey sandwich. SO good!

Double Tomato Bruschetta My favorite way to eat fresh tomatoes. Give me this and a loaf of fresh bread and I'm set!

Chocolate Chip Zucchini Brownies

1 cup all-purpose flour
1/2 cup cocoa
1/2 tsp. baking powder
1/4 tsp. salt
1/4 cup butter or non-hydrogenated margarine, melted
1/2 cup sugar
1/2 cup packed brown sugar
2 large eggs
1 tsp. vanilla
1 fairly packed cup grated raw, unpeeled zucchini (1 medium)
1/3 cup chocolate chips
2 Tbsp. ground flaxseed (optional)


-Preheat oven to 350°F.
-In a large bowl, combine flour, cocoa, baking powder and salt; set aside.
-In a medium bowl, stir together melted butter, sugar, brown sugar, eggs and vanilla until smooth. Add the egg mixture and the zucchini to the flour mixture and stir by hand until almost combined; add chocolate chips and flaxseed and stir just until blended.
-Pour into an 8” x 8” pan that has been sprayed with nonstick spray. Bake for 30–35 minutes, until the edges are springy to the touch but the middle is still slightly soft — a slight indentation should be left when touched. Do not overbake! Cool in the pan on a wire rack or eat them warm from the pan.
Makes 12 brownies.
Per Brownie: 148 calories
from the book "One Smart Cookie"

What's your favorite way to enjoy summer produce?

Tuesday, July 7, 2009

Mango chutney

This recipe is one of the first that I made as a newlywed and seven years later we are still enjoying it. It's equally delicious on grilled chicken or pork and is always a crowd pleaser.

Mango Chutney
1 ripe mango, diced
1/4 cup raisins
1/4 cup thinly sliced green onion
3 Tbs cider vinegar (or more if you want more sauce)
2 Tbs brown sugar
1/2 tsp dry mustard
1/2 tsp salt

In medium saucepan, combine half of the mango and remaining ingredients. Boil, reduce heat and simmer, covered for 5 minutes. Right before serving add remaining mango, stir and serve over grilled meat.

We enjoyed this last night over some pork chops that had been lightly oiled and seasoned with salt and fresh ground pepper. Delicious!

Monday, June 8, 2009

What's for dinner?

I love to try new recipes. In fact, we probably eat 2 or 3 new things every week. Because of that we rarely eat the same thing twice in the same month, but this recipe is an exception. I made this a few weeks ago after watching Rachael Ray make it on her show. I had planned another pasta dish for dinner that night but after seeing her make this I knew I needed to amend my meal plan. We just happened to have all the ingredients on hand and we enjoyed a delicious dinner. It's so good and easy that we're enjoying it again just a few weeks later!


Veggie Florentine Pasta

Ingredients:
1 carrot, cooked (I did it in the microwave)
1/4 cup white wine (or use chicken stock)
1/2 lb whole wheat rotini
1 small onion, chopped
1 garlic cloves, grated
1 tablespoon Extra Virgin Olive Oil
1 15 oz can diced tomatoes, crushed up (I used my mini food processor)
A few leaves basil, torn (could use dried)
Salt and ground pepper
1 bunch spinach, chopped
1/4 cup heavy cream
Nutmeg, to taste
Parmesan cheese


Directions:

Cook pasta according to package directions. While pasta cooks, heat a large skillet over medium heat and then add 1 Tbs olive oil. Saute onions and garlic until the onions are translucent. Grate cooked carrot into skillet and then add the wine or stock. Add crushed tomatoes, a few leaves of basil and season with salt and pepper. Gradually wilt the spinach into the veggie mixture, a handful or two at a time. Then drizzle in the cream. Season with freshly grated nutmeg if you have it. Let the veggie sauce thicken over medium heat for a few minutes. Add the cooked pasta to the sauce and toss to coat. Serve with Parmesan cheese on top.


Adapted from this recipe